Complete Orchid Care Guide: Understanding Their Needs

Introduction to Orchid Plant Care
Orchid Plants are admired for their elegance and exotic charm, offering a touch of beauty to any home. That said, recognising their unique needs is crucial to keeping them happy and healthy. I will guide you through the essentials of how to take care of an orchid, including choosing the right orchid potting mix, fertilisation, and maintaining a healthy environment.
Orchids come in a wide variety of species, each with its own unique look and care requirements. One of the most popular is the ‘Phalaenopsis orchid’, admired for its elegant, long-lasting pink and white flowers and ease of care; I even have two myself. The ‘Vanda’ species, known for its striking blue orchids and occasional purple orchids, is more commonly featured in bouquets.
Choosing the Right Potting Mix
I’ve discovered that the key to successful orchid care begins with choosing the right potting mix. Unlike most plants, orchids don’t tend to grow in soil; they flourish in a mix that mimics their natural environment, which includes materials like orchid bark, perlite, and charcoal. This mix provides excellent aeration and drainage, preventing root rot and promoting healthy growth.
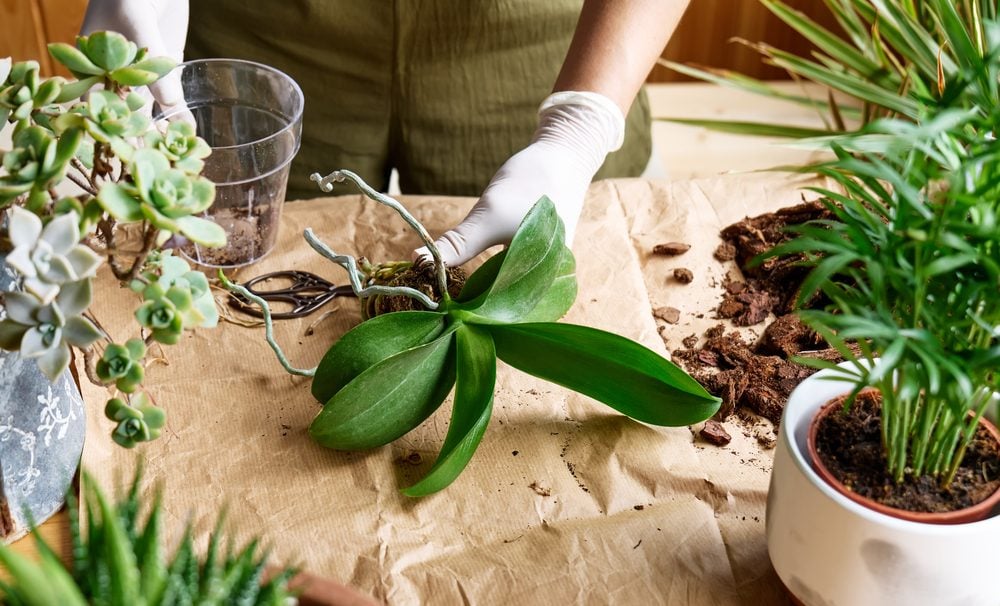
How to Repot Your Orchid
Knowing how to pot an orchid is an essential part of orchid care. This should be done every one to two years, or only after the flowers have finished blooming. This process involves transferring the orchid to a fresh potting mix to provide nutrients and prevent the build-up of salts and minerals. I also find that repotting encourages new growth by providing more space. Ensure you use a pot with suitable drainage holes, and try to be gentle with the aerial roots during the transition; these should not be buried in the mix.
How to deal with damaged Orchid roots
Repotting an orchid plant isn’t always easy and can sometimes damage the roots. I’ve come across a useful home remedy that’s likely already in your kitchen cupboard: cinnamon. When applied, it encourages the affected area to dry quickly and prevents infection. Even when removing a damaged leaf, I dab some cinnamon on the cut, and it’ll form a ‘scab’ as it heals.
How to Water Orchids
One of the challenges I initially faced when it came to caring for orchids was the watering process and how often to water orchids. A common error that can occur is over-watering, which can result in root rot. This is particularly problematic for orchids because they thrive better when their potting mix is allowed to dry out a bit between each watering.
To make things more straightforward, I’ve discovered a simple way to tell when my orchid needs water: by checking its roots. If they’re silvery or grey, I know that means it’s time to water; if they’re green, then the plant is well-hydrated. This colour change comes from a layer called the ‘velamen’, which changes depending on moisture levels. Water your orchid with room-temperature water as it’s much kinder to the plant, and avoid getting water on the leaves, since any moisture left on them can lead to fungal problems. When the leaves get dusty, I find that a quick, gentle wipe with a damp cloth works best.
How to fertilise an Orchid
Proper fertilisation is beneficial for orchids to thrive. I use an orchid-specific fertiliser every two weeks during their growing season in spring and summer, which I then reduce to once a month when they are dormant during winter. To prevent root damage, make sure to dilute the fertiliser to half the recommended strength.

Light and Temperature Requirements
Orchids thrive in environments that mimic their natural habitats. They require indirect but bright light: a north or east-facing window is ideal. Too much direct sunlight can damage the leaves, something I’ve learned the hard way. Orchids love steady temperatures, I aim for somewhere between 15°C and 26°C. Any sudden temperature changes or cold drafts can stress the plant and stunt its growth.
How Long Do Blooms Last on Orchids?
Don’t be discouraged (like I once was) if your orchid’s flowers drop after blooming; this is a natural part of its growth cycle. ‘Phalaenopsis orchids’ can take up to a year to bloom again, so a little patience and you will be rewarded with new flowers in time.
What To Do After Your Orchid Blooms
Once the Orchid flowers have dropped, I usually trim the flower spike back to a node (a small bump on the stem) to help encourage new growth, or remove it entirely from the base if it’s brown and dry. Continue watering as usual, allowing the potting mix to dry slightly each time, and keep the plant in bright, indirect light.
Summary
By understanding and meeting your orchid’s needs, you can fill your home with vibrant, long-lasting blooms. Choosing the right potting mix, providing proper fertilisation, and maintaining ideal growing conditions will help your orchids thrive, not just survive, rewarding you with a stunning display of natural beauty. I’m positive these simple tips can elevate your orchid care and ensure healthy, flourishing plants.